About this ad вирус

Название угрозы: About This Ad

Исполяемый файл: (randomname).dll

Тип угрозы: Adware

Затронутые ОС: Win32/Win64 (Windows XP, Vista/7, 8/8.1, Windows 10)

Способ заражения About This Ad


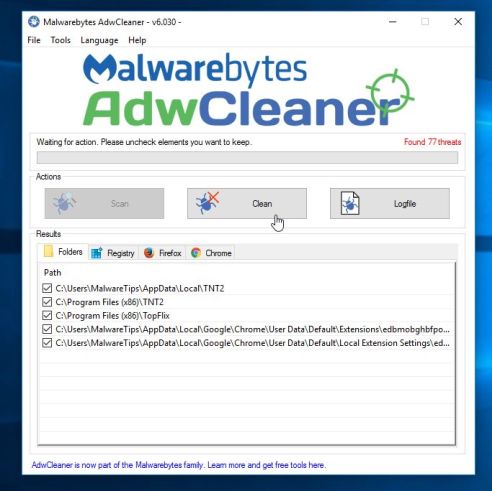
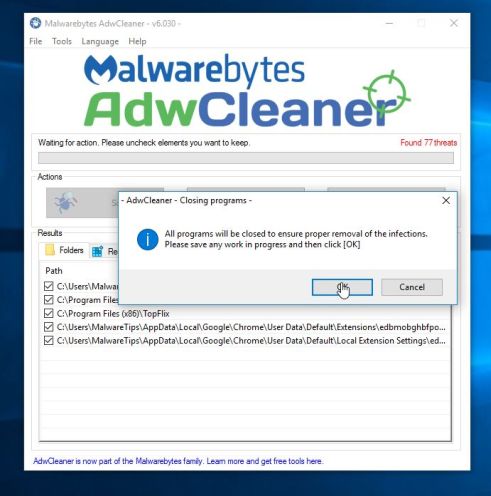
устанавливается на ваш компьютер вместе с бесплатными программами. Этот способ можно назвать "пакетная установка". Бесплатные программы предлагают вам установить дополнительные модули (About This Ad). Если вы не отклоните предложение установка начнется в фоне. About This Ad копирует свои файлы на компьютер. Обычно это файл (randomname).dll. Иногда создается ключ автозагрузки с именем About This Ad и значением (randomname).dll. Вы также сможете найти угрозу в списке процессов с именем (randomname).dll или About This Ad. также создается папка с названием About This Ad в папках C:\Program Files\ или C:\ProgramData. После установки About This Ad начинает показывать реламные баннеры и всплывающую рекламу в браузерах. рекомендуется немедленно удалить About This Ad. Если у вас есть дополнительные вопросы о About This Ad, пожалуйста, укажите ниже. Вы можете использовать программы для удаления About This Ad из ваших браузеров ниже.

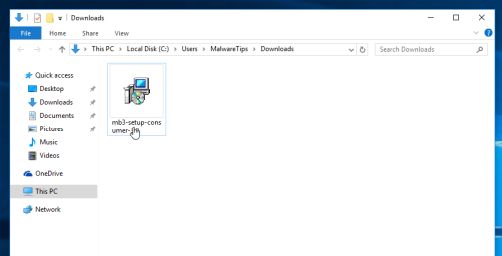
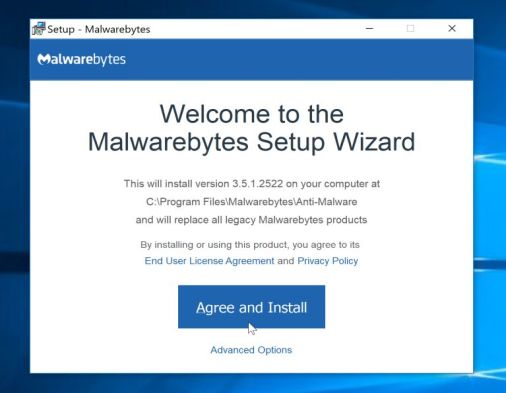
Скачайте утилиту для удаления

Скачайте эту продвинутую утилиту для удаления About This Ad и (randomname).dll (загрузка начнется немедленно):

* Утилита для удаления был разработан компанией EnigmaSoftware и может удалить About This Ad автоматически. Протестирован нами на Windows XP, Windows Vista, Windows 7, Windows 8 и Windows 10. Триальная версия Wipersoft предоставляет функцию обнаружения угрозы About This Ad бесплатно.

Функции утилиты для удаления

  • Удаляет файлы созданные About This Ad.
  • Удаляет ключи реестра созданные About This Ad.
  • Активируйте активную защиту для предотвращения заражения.
  • Решите побочные проблемы с браузерами (реклама, перенаправления).
  • Удаление гарантировано - если Wipersoft не справляется обратитесь за бесплатной поддержкой.
  • Тех. поддержка в режиме 24/7 включена в предложение.

Скачайте Spyhunter Remediation Tool от Enigma Software

Скачайте антивирусные сканер способный удалить About This Ad и (randomname).dll (загрузка начнется немедленно):

Функции Spyhunter Remediation Tool

  • Удаляет файлы созданные About This Ad.
  • Удаляет ключи реестра созданные About This Ad.
  • Устраняет браузерные проблемы.
  • "Утилита для удаления тулбаров" поможет избавиться от нежелательных дополнений.
  • Удаление гарантировано - если Spyhunter Remediation Tool не справляется обратитесь за бесплатной поддержкой.
  • Тех. поддержка в режиме 24/7 включена в предложение.

We noticed that you are on smartphone or tablet now, but you need this solution on your PC. Enter your email below and we’ll automatically send you an email with the downloading link for About This Ad Removal Tool, so you can use it when you are back to your PC.

Наша служба тех. поддержки удалит About This Ad прямо сейчас!

Здесь вы можете перейти к:

Как удалить About This Ad вручную

Проблема может быть решена вручную путем удаления файлов, папок и ключей реестра принадлежащих угрозе About This Ad. Поврежденные About This Ad системные файлы и компоненты могут быть восстановлены при наличии установочного пакета вашей операционной системы.

Чтобы избавиться от About This Ad, необходимо:

1. Остановить следующие процессы и удалить соответствующие файлы:

  • (randomname).dll

Предупреждение: нужно удалить только файлы с именами и путями указанными здесь. В системе могут находится полезные файлы с такими же именами. Мы рекомендуем использовать утилиту для удаления About This Ad для безопасного решения проблемы.

2. Удалить следующие вредоносные папки:

  • (randomname)

3. Удалить следующие вредоносные ключи реестра и значения:

  • Key: (randomname)

Предупреждение: если указано значение ключа реестра, значит необходимо удалить только значение и не трогать сам ключ. Мы рекомендуем использовать для этих целей утилиту для удаления About This Ad.

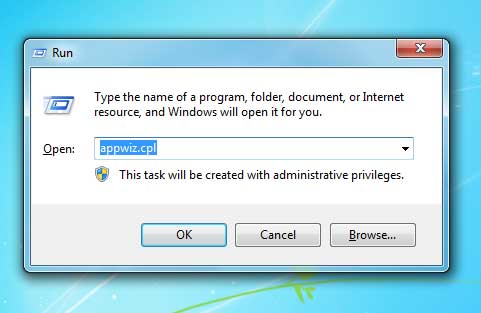
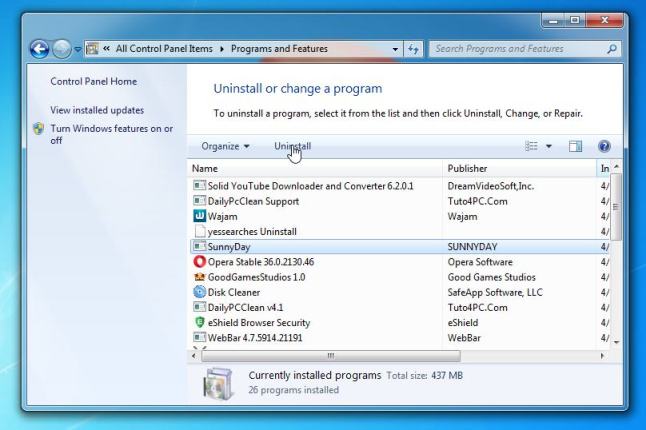
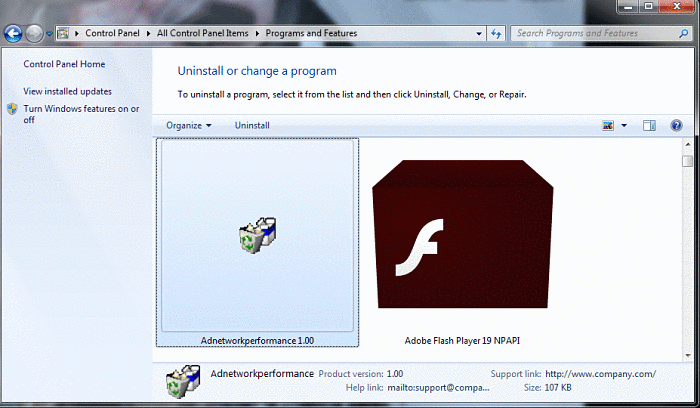
Удалить программу About This Ad и связанные с ней через Панель управления

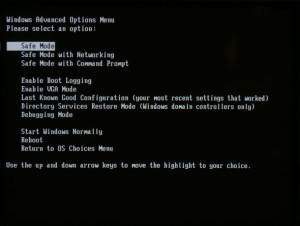
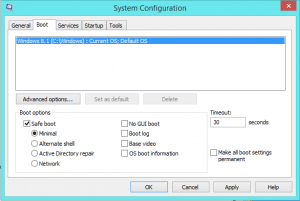
Мы рекомендуем вам изучить список установленных программ и найти About This Ad а также любые другие подозрительные и незнакомы программы. Ниже приведены инструкции для различных версий Windows. В некоторых случаях About This Ad защищается с помощью вредоносного процесса или сервиса и не позволяет вам деинсталлировать себя. Если About This Ad не удаляется или выдает ошибку что у вас недостаточно прав для удаления, произведите нижеперечисленные действия в Безопасном режиме или Безопасном режиме с загрузкой сетевых драйверов или используйте утилиту для удаления About This Ad.

Windows 10

  • Кликните по меню Пуск и выберите Параметры.
  • Кликните на пункт Система и выберите Приложения и возможности в списке слева.
  • Найдите About This Ad в списке и нажмите на кнопку Удалить рядом.
  • Подтвердите нажатием кнопки Удалить в открывающемся окне, если необходимо.
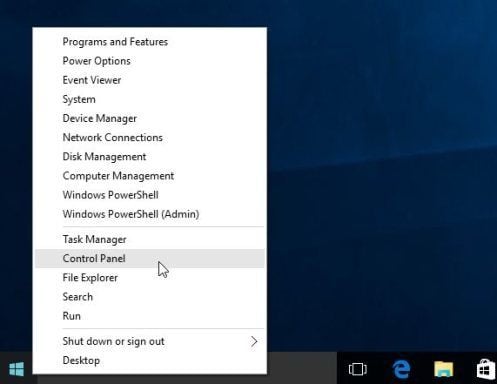
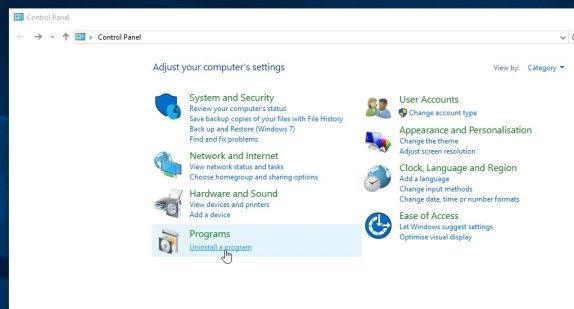
Windows 8/8.1

  • Кликните правой кнопкой мыши в левом нижнем углу экрана (в режиме рабочего стола).
  • В открывшимся меню выберите Панель управления.
  • Нажмите на ссылку Удалить программу в разделе Программы и компоненты.
  • Найдите в списке About This Ad и другие подозрительные программы.
  • Кликните кнопку Удалить.
  • Дождитесь завершения процесса деинсталляции.
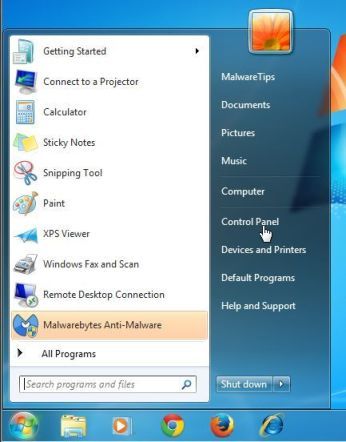
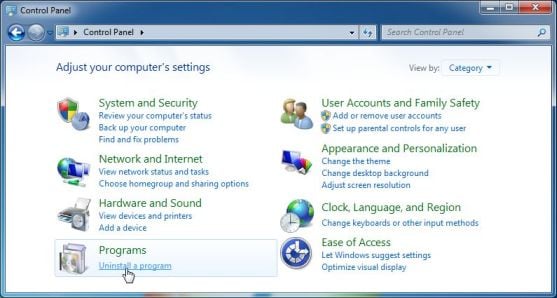
Windows 7/Vista

  • Кликните Пуск и выберите Панель управления.
  • Выберите Программы и компоненты и Удалить программу.
  • В списке установленных программ найдите About This Ad.
  • Кликните на кнопку Удалить.

Windows XP

  • Кликните Пуск.
  • В меню выберите Панель управления.
  • Выберите Установка/Удаление программ.
  • Найдите About This Ad и связанные программы.
  • Кликните на кнопку Удалить.

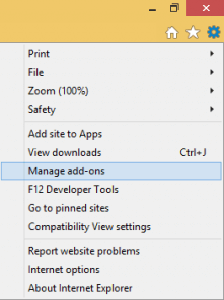
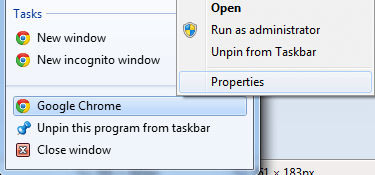
Удалите дополнения About This Ad из ваших браузеров

About This Ad в некоторых случаях устанавливает дополнения в браузеры. Мы рекомендуем использовать бесплатную функцию "Удалить тулбары" в разделе "Инструменты" в программе Spyhunter Remediation Tool для удаления About This Ad и свяанных дополнений. Мы также рекомендуем вам провести полное сканирование компьютера программами Wipersoft и Spyhunter Remediation Tool. Для того чтобы удалить дополнения из ваших браузеров вручную сделайте следующее:

Предупреждение: Эта инструкция лишь деактивирует дополнение. Для полного удаления About This Ad используйте утилиту для удаления About This Ad.
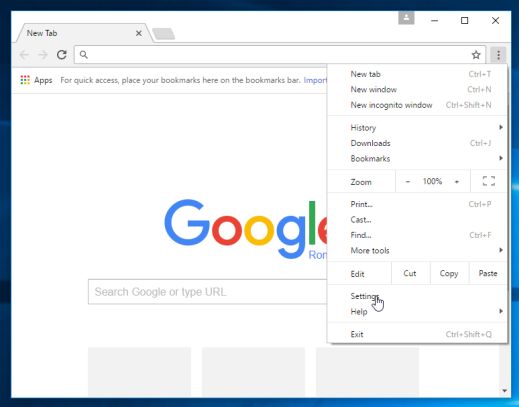
Google Chrome

  • Запустите Google Chrome.
  • В адресной строке введите chrome://extensions/.
  • В списке установленных дополнений найдите About This Ad и кликните на иконку корзины рядом.
  • Подтвердите удаление About This Ad.
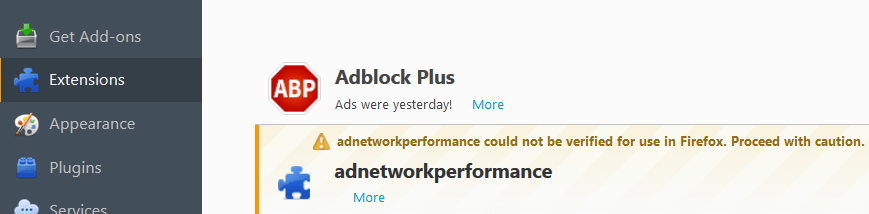
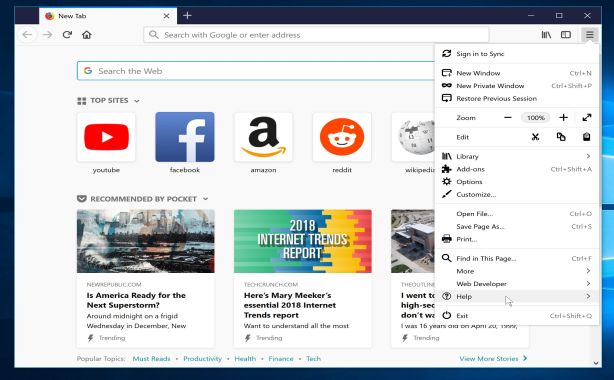
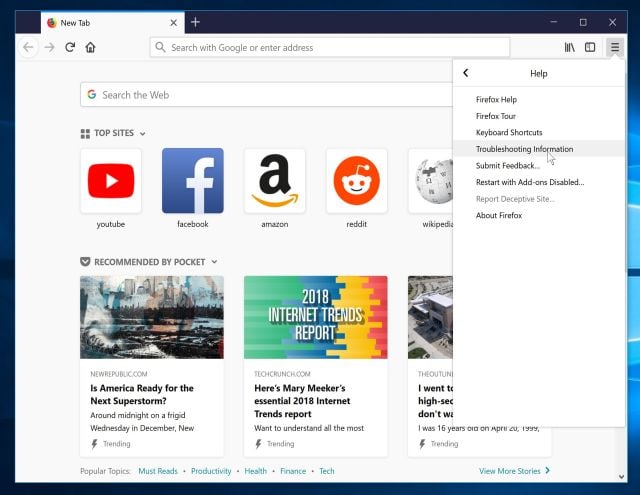
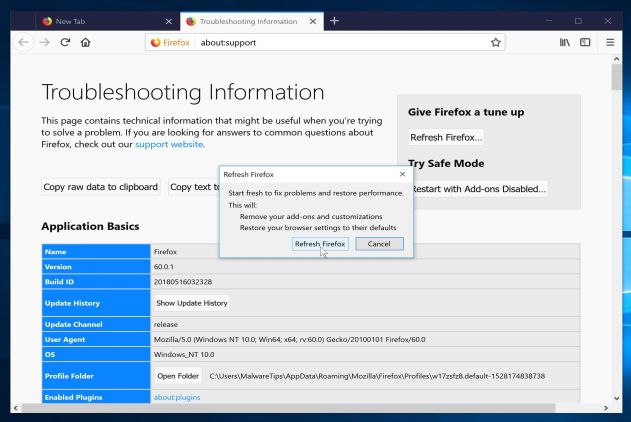
Mozilla Firefox

  • Запустите Firefox.
  • В адресной строке введите about:addons.
  • Кликните на вкладку Расширения.
  • В списке установленных расширений найдите About This Ad.
  • Кликните кнопку Удалить возле расширения.

Защитить компьютер и браузеры от заражения

Рекламное программное обеспечение по типу About This Ad очень широко распространено, и, к сожалению, большинство антивирусов плохо обнаруживают подобные угрозы. Чтобы защитится от этих угроз мы рекомендуем использовать SpyHunter, он имеет активные модули защиты компьютера и браузерных настроек. Он не конфликтует с установленными антивирусами и обеспечивает дополнительный эшелон защиты от угроз типа About This Ad.

Parasite may reinstall itself multiple times if you don't delete its core files. We recommend downloading SpyHunter to scan for malicious programs installed with it. This may save you hours and cut down your time to about 15 minutes.


This article aims to help users remove Ad Network Performance Virus (or adnetworkperformance display virus) from their respective system.


We are pretty sure you have been affected by Ad Network Performance Virus in one way or another if you are reading this article. If you are looking for general information about this program then continue reading. If you are looking for a way to remove it from your system then no worries – we will provide this for you as well.

Adnetworkperformance display virus

First of all you should know what you are dealing with and that is most likely a virus of the Adware class. Typically adnetworkperformance display virus will provide a never-ending stream of Ads for you to deal with. Whether in the form of pop-up windows or banners one thing is certain – there will be no way for you to completely ignore them. The displayed advertisements can actually promote a number of things but most likely they will offer you something that might be of some interest to you. In order to achieve this effect Ad Network Performance Virus targets your online browsing data – history, cache, cookies, related searches. As you can imagine this is quite dangerous for the affected user and might have some very serious implications.

Other negative effects attributed to Ad Network Performance Virus

At the very least you are going to experience severe computer slowdown. That is mainly due to the fact that any time you load a web page an ad is also going to be loaded so it will take double the amount of processing power to load it successfully. This is quite taxing for any system and will certainly take its toll down the road if not taken care of. But especially for older systems it might lead to a complete freezing of the OS or even a blue screen of death.

Another aspect for you to consider is that these advertisements if interacted with will very often lead to fake websites that are looking like the real deal but are in fact not. Even a small difference in the URL address is a clear sign that you have been redirected to a dangerous place. This can be quite tricky to notice but you should be on the lookout at least until you remove Ad Network Performance Virus from your computer.

Another important tip to remember – never install anything prompted by this malware.

SUMMARY:

Things readers are interested in:

STEP 1 :

UPDATE! You can visit this article for an updated version of the guide: Remove Pop-Up Ads from Chrome/Firefox (Adware Virus)

Our first step here is a reboot in Safe Mode . If you already know how to do it, just skip this and proceed to Step 2 . If you do not know how to do it, continue reading :

For Windows 98, XP, Millenium and 7 Users :

Restart your computer. To be sure you don’t miss the time when you need to press it, just spam F8 as soon as the PC starts booting. In the new menu, choose Safe Mode With Networking.


Proceed to Step 2 .

For W. 8 and 8.1 Users :

Click the Start button ,then Control Panel —> System and Security —> Administrative Tools —> System Configuration . ‌


Then check the Safe Boot option and click OK. C lick Restart in the new pop-up .

Proceed to Step 2.

For Windows 10 Users:

  1. Open the Start menu.
  2. Click the power button icon in the right corner of the new Start menu to show the power options menu.
  3. Press and hold down the SHIFT key on the keyboard and click the Restart option while still holding down the SHIFT key.

Windows 10 will perform the reboot. Next do the following:

Click the Troubleshoot icon, then Advanced options —> Startup Settings. Click Restart.
After the reboot click on Enter Safe Mode With Networking (Fifth Option).

Continue with Step 2.

STEP 2 :

To remove parasite on your own, you may have to meddle with system files and registries. If you were to do this, you need to be extremely careful, because you may damage your system.

If you want to avoid the risk, we recommend downloading SpyHunter
a professional malware removal tool.

From the moment Ad Network Performance Virus has infiltrated your system all your browsers have in turn been infected with the virus. Even browsers you have not used in a while have been affected. You will have to apply Step 2 and Step 3 from our removal guide for and every browser – do not leave any trace of the malicious software unattended. Also do not forget that IE comes bundled with every Windows installation.

If you have failed to utilize our advice about file installation from suspicious sources, do your best to try and remember what was installed – you will have to remove everything pretty soon. Look for clues in the next two steps of the guide, if you notice something out of the ordinary write it down and ask us in the comments section, we will do our best to help you.

Open IE , then click
—–> Manage Add-ons .


Find Ad Network Performance Virus . Remove it by pressing Disable .

If your Home Page is different from the usual, click
—–> Internet Options> edit the URL box with your preferred search engine , and click Apply.

Go to STEP 3.


For Mozilla Firefox Users:

Open Firefox , click on
(top right) ——-> Add-ons . Hit Extensions next.


Ad Network Performance Virus should be somewhere around here – Remove it .

Go to STEP 3.


For Google Chrome Users :

Start Chrome , click —–> More Tools —–> Extensions. There , find the virus and select (Remove).


C lick again, and proceed to Settings —> Search, the fourth tab, select Manage Search Engines. Remove anything but the search engines you normally use .

Go to STEP 3.


For Safari Users:

Open Safari , and click Safari —–> Preferences —–> Extensions —– >Uninstall the malware.

Go to STEP 3.

STEP 3:

Right click on the browser’s shortcut, then click Properties.

NOTE: We are showing Google Chrome, but the method is the same for all browsers.


Once you’ve reached Properties —–> Shortcut (on the band at the top), then in the Target type field, REMOVE EVERYTHING AFTER .exe.


Continue with STEP 4.

STEP 4 :

Hold the Windows Key and R together . Write appwiz.cpl in the new field , then click OK.


You are now in the Control Panel . Search around for Ad Network Performance Virus and anything else suspicious-looking. Uninstall it/them. Also, be extremely careful. Viruses often spend one last ditch effort to trick you into installing more of their kind. If you see a screen like this when you click Uninstall , choose NO:


Hold the Windows Key and R again – but this time copy + paste the following and click OK:

notepad %windir%/system32/Drivers/etc/hosts

A .txt file will open – don’t touch anything there. If you are hacked and someone has access to your PC, there will be a bunch of other IPs connected to you at the bottom. This is what a hosts file looks like:


If there are a bunch of strange IPs connecting to you below “Localhost” you may be hacked, and it’s best to ask us in the comments for directions.

Go to STEP 5.

STEP 5 :

Open the Task Manager by right clicking on the Taskbar and choosing Start Task Manager .


Once it opens, choose the Processes Tab . Look at all of the processes in front of you and try to determine which ones are a virus. Google them or ask us in the comments and we will provide the best assistance we can.

A BIG WARNING! READ CAREFULLY BEFORE PROCEEDING!

We get asked this a lot, so we are putting it here: Removing parasite manually may take hours and damage your system in the process. We recommend downloading SpyHunter to see if it can detect parasite files for you.

Right click on each of the virus processes separately and select Open File Location . End the process after you open the folder. Just to make sure we don’t delete any programs you mistakenly took for a virus, copy the folders somewhere, then delete the directories you were sent to .


Move on to STEP 6.

Take a look at the following things:

Type msconfig in the search field and hit enter: you will be transported to a new window.


Go in the Startup tab and Uncheck anything that has “Unknown” as Manufacturer.

Type Regedit in the windows search field and press Enter.

Once inside, press CTRL and F together and type the virus’s Name. Right click and delete any entries you find with a similar name. If you can’t find them this way, look in these directories, and delete the registries manually:

Remember to leave us a comment if you run into any trouble!

Did we help you? Please, consider helping us by spreading the word!

STEP 7 – Optimization

We’ve prepared a short and sweet optimization guide, specifically designed for users who just removed a virus. It is completely free, you do not need to download anything, and it’s not very time consuming. If you are interested – How To Remove Guide’s Optimization Tips .

Что делать, если антивирус обнаружил not-a-virus: какие они бывают и с чем их едят.


21 августа 2017


Иногда Kaspersky Internet Security вдруг выводит желтое окошко и пишет, что на вашем компьютере обнаружен not-a-virus. Немудрено смутиться: если это не-вирус, то зачем антивирусная программа мне об этом сообщает?

В Kaspersky Internet Security словом Not-a-virus называются по большому счету два типа программ — adware и riskware. Оба эти типа не зловредны сами по себе, поэтому вирусами их не назовешь. Однако пользователю неплохо бы знать об их существовании, поскольку эти программы могут делать что-то, что ему может не понравиться.

Что такое Adware

Adware — это рекламные приложения. Они могут показывать вам рекламу, менять поисковую выдачу, подсовывая одни сайты взамен других, собирать о вас данные, чтобы в дальнейшем подстраивать контекстную рекламу под ваши интересы, или делать все это сразу.

Вроде бы ничего зловредного, но и ничего приятного тоже. Особенно весело становится тогда, когда подобных программ на компьютер пробирается десяток-другой и они начинают конкурировать друг с другом за ресурсы.

Если же рекламная программа никак не уведомляет пользователя о том, что она пытается установиться на компьютер, то Kaspersky Internet Security считает такую программу зловредным трояном. Тогда сообщение будет уже не в желтой, а в красной рамочке, и работа такой программы будет немедленно заблокирована. Кстати, тут можно подробнее почитать о том, что означают цвета окошек уведомлений в наших продуктах.

Riskware — немного другое дело. В этот тип попадают разнообразные программы, которые изначально созданы для чего-то полезного и могут использоваться на компьютере по назначению. Но зачастую их устанавливают — без ведома пользователя, разумеется — злоумышленники в недобрых целях. Полный список типов программ, которые мы относим к riskware, можно посмотреть тут.

Например, к riskware относятся программы для удаленного управления компьютером (Remote Admin). Если вы сами установили такую программу и знаете, что делаете, то никакого вреда она не принесет. Однако плохие парни нередко используют программы такого рода как часть зловредного комплекса, — и в этом случае пользователю полезно знать о том, что на его компьютере неожиданно завелось что-то подобное.

Другой пример — утилиты для загрузки файлов. Многие из них действительно повышают удобство загрузки файлы. Но некоторые работают на грани фола, вместе с полезным файлом норовя загрузить еще пачку других программ, показав предупреждение о том, что загружен будет не только искомый файл, например, серым шрифтом на сером фоне.

Из прочих распространенных видов riskware стоит упомянуть тулбары, которые, кстати, также могут относиться и к adware — в зависимости от функциональности и степени навязчивости. Бывают и другие расширения для браузера, которые также могут относиться к riskware.

Еще в категорию riskware попадают майнеры — программы для добычи биткоинов. Разумеется, если вы сами сознательно поставили на свой компьютер майнер, то все хорошо. Но вполне может быть так, что кто-то сделал это без вашего ведома — и теперь расходует ресурсы вашего компьютера для собственного обогащения.

Kaspersky Internet Security выводит уведомления об обнаружении такого рода программ, чтобы вы знали, что они есть на вашем компьютере. Возможно, вы поставили их осознанно — как мы уже говорили, среди riskware-приложений бывают очень даже полезные. В таком случае можно не беспокоиться.

С другой стороны, возможно, очередной not-a-virus пробрался на компьютер незамеченным. И в этом случае вам лучше знать, что эта программа относится либо к riskware, либо к adware. Поэтому пользователю предлагается выбрать, что делать с программой. Если вы ее не ставили — то лучше удалить.


Stelian Pilici December 5, 2016 Adware

In this first step, we will try to identify and remove any malicious program that might be installed on your computer.

    Go to the uninstall menu.

  1. To uninstall a program on Windows 10 or Windows 8, right-click on the Windows Start button and choose “Control Panel” from the pop-up menu.

  2. When the “Control Panel” window opens click on the “Uninstall a program” option under “Programs” category.

  1. If you are using Windows XP, Windows Vista or Windows 7, click the “Start” button, then click on the “Control Panel” menu option.

  2. When the “Control Panel” window opens click on the “Uninstall a program” option under “Programs” category.

If you cannot find any unwanted programs on your computer, you can proceed with the next step.


Malwarebytes AdwCleaner is a free utility that will scan your computer for “Ads not by this site” adware and other malicious programs that may be installed.

  1. You can download Malwarebytes AdwCleaner from the below link.
    MALWAREBYTES ADWCLEANER DOWNLOAD LINK (This link will start the download of “Malwarebytes AdwCleaner” on your computer)
  2. When Malwarebytes AdwCleaner has finished downloading, please double-click on the AdwCleaner icon to perform a system scan with this program.


    If Windows prompts you as to whether or not you wish to run Malwarebytes AdwCleaner, please allow it to run.

  3. When the Malwarebytes AdwCleaner program will open, click on the “Scan” button as shown below.


    Malwarebytes AdwCleaner will now start to search for the Ads not by this site adware and other malicious programs.
  4. To remove the malicious files that were detected in the previous step, please click on the “Clean” button.

  5. Malwarebytes AdwCleaner will prompt you to save any open files or documents, as the program will need to reboot the computer to complete the cleaning process. Please do so, and then click on the “OK” button.


    When your computer reboots and you are logged in, Malwarebytes AdwCleaner will automatically open a log file that contains the files, registry keys, and programs that were removed from your computer. Please review this log file and then close the notepad window. You can now continue with the rest of the instructions.

Malwarebytes Anti-Malware is a powerful on-demand scanner which should remove the Ads not by this site pop-ups from your machine. It is important to note that Malwarebytes Anti-Malware will run alongside antivirus software without conflicts.

  1. You can download download Malwarebytes Anti-Malware from the below link.
    MALWAREBYTES ANTI-MALWARE DOWNLOAD LINK(This link open a new page from where you can download “Malwarebytes Anti-Malware”)
  2. When Malwarebytes has finished downloading, double-click on the “mb3-setup-consumer” file to install Malwarebytes Anti-Malware on your computer.


    You may be presented with an User Account Control pop-up asking if you want to allow Malwarebytes to make changes to your device. If this happens, you should click “Yes” to continue with the installation.

  3. When the Malwarebytes installation begins, you will see the Malwarebytes Setup Wizard which will guide you through the installation process.


    To install Malwarebytes Anti-Malware on your machine, keep following the prompts by clicking the “Next” button.

  4. Once installed, Malwarebytes will automatically start and update the antivirus database. To start a system scan you can click on the “Scan Now” button.

  5. Malwarebytes Anti-Malware will now start scanning your computer for malicious programs.
    This process can take a few minutes, so we suggest you do something else and periodically check on the status of the scan to see when it is finished.

  6. When the scan has completed, you will be presented with a screen showing the malware infections that Malwarebytes Anti-Malware has detected.
    To remove the malicious programs that Malwarebytes has found, click on the “Quarantine Selected” button.

  7. Malwarebytes Anti-Malware will now quarantine all the malicious files and registry keys that it has found.
    To complete the malware removal process, Malwarebytes may ask you to restart your computer.


    When the malware removal process is complete, you can close Malwarebytes Anti-Malware and continue with the rest of the instructions.

HitmanPro can find and remove malware, adware, bots, and other threats that even the best antivirus suite can oftentimes miss. HitmanPro is designed to run alongside your antivirus suite, firewall, and other security tools.

  1. You can download HitmanPro from the below link:
    HITMANPRO DOWNLOAD LINK(This link will open a new web page from where you can download “HitmanPro”)
  2. When HitmanPro has finished downloading, double-click on the “hitmanpro” file to install this program on your computer.


    You may be presented with an User Account Control pop-up asking if you want to allow HitmanPro to make changes to your device. If this happens, you should click “Yes” to continue with the installation.

  3. When the program starts you will be presented with the start screen as shown below. Now click on the Next button to continue with the scan process.

  4. HitmanPro will now begin to scan your computer for malware.

  5. When it has finished it will display a list of all the malware that the program found as shown in the image below. Click on the “Next” button, to remove malware.

  6. Click on the “Activate free license” button to begin the free 30 days trial, and remove all the malicious files from your computer.


    When the process is complete, you can close HitmanPro and continue with the rest of the instructions.

  1. Click on Chrome’s main menu button, represented by three horizontal lines. When the drop-down menu appears, select the option labeled Settings.

  2. Chrome’s Settings should now be displayed in a new tab or window, depending on your configuration. Next, scroll to the bottom of the page and click on the Show advanced settings link (as seen in the below example).

  3. Chrome’s advanced Settings should now be displayed. Scroll down until the Reset browser settings section is visible, as shown in the example below. Next, click on the Reset browser settings button.

  4. A confirmation dialog should now be displayed, detailing the components that will be restored to their default state should you continue on with the reset process. To complete the restoration process, click on the Reset button.

  1. In the upper-right corner of the Firefox window, click the Firefox menu button, then click on the “Help”
    button.

  2. From the Help menu, choose Troubleshooting Information.
    If you’re unable to access the Help menu, type about:support in your address bar to bring up the Troubleshooting information page.

  3. Click the “Refresh Firefox” button in the upper-right corner of the “Troubleshooting Information” page.

  4. To continue, click on the “Refresh Firefox” button in the new confirmation window that opens.

  5. Firefox will close itself and will revert to its default settings. When it’s done, a window will list the information that was imported. Click on the “Finish“.

  • Run a system scan with Zemana AntiMalware
  • Ask for help in our Malware Removal Assistance forum.

It is your turn to help other people. We have written this guide to help people, however, we need your help to share this article. You can use the below buttons to share this article on your favorite social media site.

We really like the free versions of Malwarebytes and HitmanPro, and we love the Malwarebytes Premium and HitmanPro.Alert extra features.

Malwarebytes Premium sits beside your traditional antivirus, filling in any gaps in its defenses, providing extra protection against sneakier security threats. You can use Malwarerbytes on Windows, macOS, or Android devices.

Читайте также:

Пожалуйста, не занимайтесь самолечением!
При симпотмах заболевания - обратитесь к врачу.

Copyright © Инфекционные заболевания

Name Ad Network Performance Virus
Type Adware
Danger Level Medium (May try to install other dangerous software on your machine on spy on your browsing habits)
Symptoms Unwanted Ads and Toolbars, search engine redirects.
Distribution Method Software bundles, Email attachments, online Ads, infected torrent files.
Detection Tool