
Конвертер из тиф в автокад
Конвертирование файлов AutoCAD DWG в формат TIFF необходимо для некоторых приложений. Они используются для предварительной подготовки к печати и отправки по факсу. Каждое из этих приложений может иметь определенные требования к конвертации.Программа Универсальный Конвертер Документов может легко выполнить их. Универсальный Конвертер Документов поможет вам конвертировать файлы AutoCAD DWG в формат TIFF. Вы можете изменять все параметры конвертации.
На этой странице:
Как конвертировать файлы чертежей Autodesk AutoCAD в формат TIFF
Если на ваш компьютер установлена программа Универсальный Конвертер Документов, то вы легко можете сохранять чертежи AutoCAD в формате TIFF.

Объединение нескольких чертежей в один файл TIFF
Иногда удобно объединять все детали проекта в один файл.
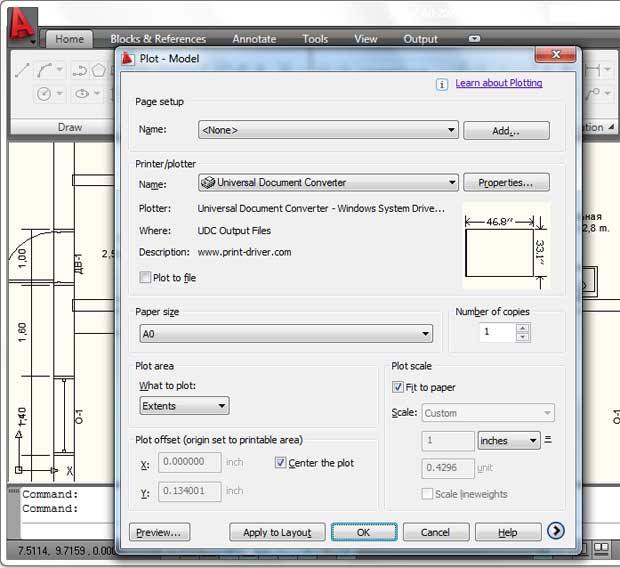
- Откройте чертеж и нажмите Plot (Печать)
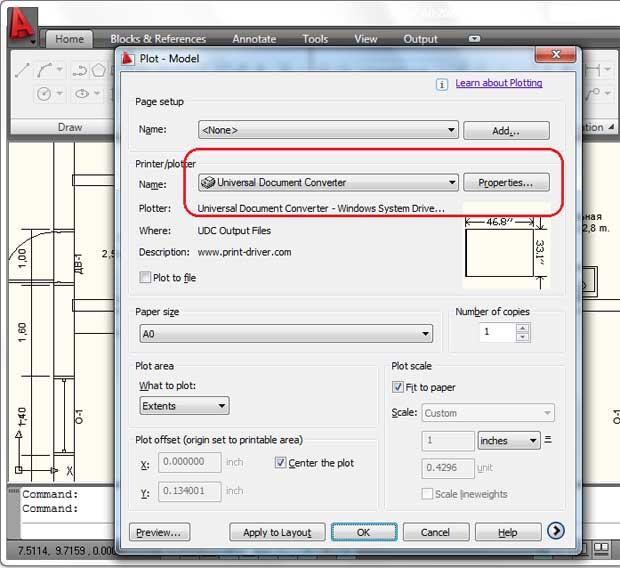
- Выберите Универсальный Конвертер Документов из списка плоттеров и нажмите Properties (Свойства).
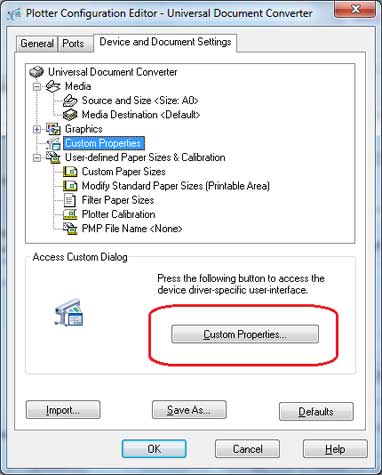
- Выберите Custom Properties (Настраиваемые свойства) во вкладке Device and Document Settings(Настройки устройства и документа) и нажмите кнопку Custom Properties (Настраиваемые свойства) в области Access Custom Dialog (Доступ к диалоговому окну настройки)
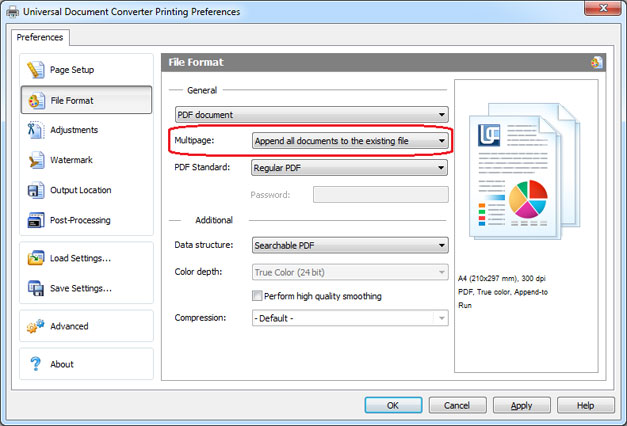
- На панели настроек программы Универсальный Конвертер Документов выберите требуемый размер страницы
- Измените выходной формат файла на TIFF Image
- Выберите параметр Append all documents to the existing file (Прикрепить все документы к существующему файлу). Это показано на скриншоте снизу
После этого все распечатываемые чертежи прикрепятся к файлу TIFF. Этот файл выбирается в области Output location (Место назначения).
Как поместить водяные знаки на чертеж для защиты авторских прав
Помещая водяные знаки на чертежи, вы защищаете свою интеллектуальную собственность.
- Откройте чертеж и нажмите Plot (Печать)
- Выберите Универсальный Конвертер Документов из списка плоттеров и нажмите Properties (Свойства).
- Выберите Custom Properties (Настраиваемые свойства) во вкладке Device and Document Settings(Настройки устройства и документа) и нажмите кнопку Custom Properties (Настраиваемые свойства) в области Access Custom Dialog (Доступ к диалоговому окну настройки)
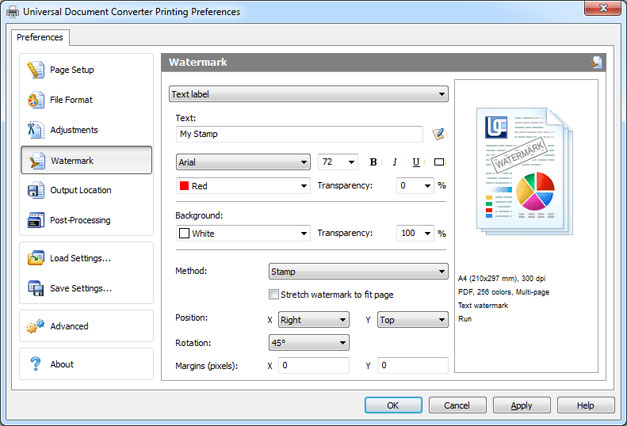
- На панели настроек Универсального Конвертера Документов перейдите в область Watermark (Водяной знак) . Выберите желаемый тип водяного знака.
Как конвертировать файлы AutoCAD DWG в формат TIFF в режиме пакетной обработки данных
Конвертацию нескольких чертежей, находящихся в файлах AutoCAD DWG, в формат TIFF можно облегчить с помощью пакетной конвертации AutoCAD DWG в PDF. Для этого используйте ПО Print Conductor . Оно поставляется вместе с программой Универсальный Конвертер Документов.
- Добавьте чертежи, которые нужно конвертировать, в список
- Выберите принтер Универсальный Конвертер Документов
- Нажмите Change Settings(Изменить настройки) , чтобы задать папку назначения, и TIFF Image в качестве формата выходного файла
- Нажмите Start(Старт), чтобы начать конвертацию чертежей и графиков в формат TIFF.

Примеры кода конвертации AutoCAD в TIFF для разработчиков
Для разработчиков ПО Универсальный Конвертер Документов предлагает несколько полезных ресурсов. Функции программы Универсальный Конвертер Документов можно посмотреть public API and code examples (общедоступный интерфейс прикладного программирования и примеры кодов). Коды доступны для нескольких языков программирования.
С помощью “ядра конвертации” программы Универсальный Конвертер Документов можно использовать функции программы в похожих проектах.
Технологический Университет г. Куртин
Как перевести/сохранить Автокад в pdf
Иногда возникает необходимость распечатать чертеж, где не установлен Автокад, или отправить его Заказчику на согласование. Поэтому самый правильный путь — сохранить Автокад в pdf.
Давайте рассмотрим несколько вариантов, как сохранить автокад в пдф. Изначально лучше всего настроить параметры листов, которые используются для оформления и дальнейшей распечатки чертежа.


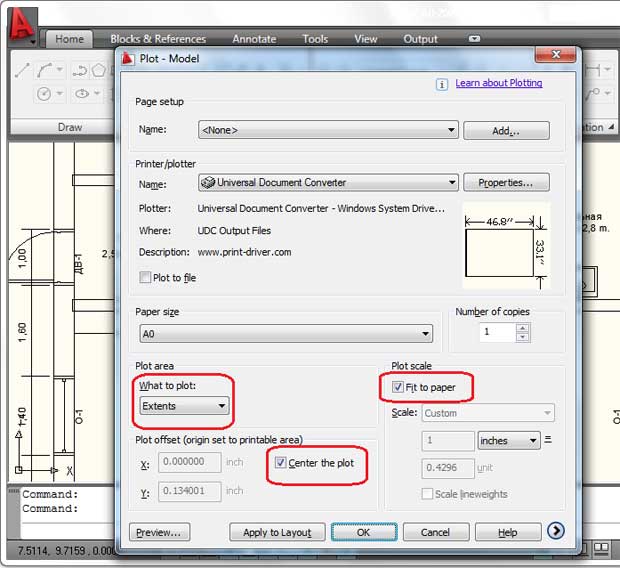
Определитесь с форматом и масштабом. Так же установите подходящую ориентацию чертежа. Особое внимание стоит уделить области печати. Есть 3 варианта: граница, лимиты, экран. Подберите подходящий способ.

Особое внимание уделите стилям печати. Если выбрать вариант monochrome.ctb, то весь чертеж будет выводится в черно-белом (монохромном) виде. Также важно, какое качество печати вы выберите.

Нажав просмотр в левом нижнем углу, вы можете видеть результат настройки.


Откроется уже знакомое нам диалоговое окно. Т.к. ранее был создан набор параметров, достаточно его выбрать. В противном случае выполните необходимые настройки, как описано выше.

Чтобы выполнить экспорт из автокада в пдф, необходимо выбрать меню приложения → Экспорт → PDF, как показано на рисунке.

Откроется диалоговое окно, как показано на рисунке.

Выполнить сохранение чертежа Автокада в пдф можно также через публикацию.


Далее появится диалоговое окно, в котором Вам будет предложено сохранить текущий список листов.

Еще одно информационное окно, предупреждает вас о том, что публикация выполняется в фоновом режиме. Просто закройте его.

Как вы видите, преобразовать или сохранить Автокад в пдф можно разными способами. Результат будет один и тот же. Помните, что данный формат обладает такими неоспоримыми преимуществами, как:
— на основе чертежа создается файл пдф, который можно открыть на компьютере, даже если не установлен AutoCAD;
— качество не теряется;
— при повторном открытии файла с разрешением .pdf в Автокаде в качестве подложки, можно использовать объектные привязки к элементам чертежа.
Итак, мы разобрали как в AutoCAD сохранить в PDF файл чертежа в формате .dwg. Надеюсь, у Вас больше не возникнет с этим проблем.
Как перенести чертеж в Автокаде?
В зависимости от этого существует несколько вариантов:
1) Перенос чертежей в Автокаде из одного файла в другой выполняется путем копирования исходных элементов (Ctrl+C) и их вставкой в др. чертеж (Ctrl+V).
2) Перенос чертежей в Автокад из картинки (*.jepg, *.png, *.tif) и pdf-формата автоматически выполнить нельзя! Все дело в том, что картинка представляет собой растровый формат, в то время как чертеж Автокада – векторный. Поэтому очень часто приходится прибегать к оцифровке или векторизации чертежей.
Существует большое количество сервисов, которые позволяют перенести чертеж в Автокад с картинки, автоматически преобразовав отдельные элементы в примитивы: линии, дуги, полилинии и т.д.
Вместо одной дуги получается огромное количество полилиний. Такой результат существенно перегружает проект, что затрудняет дальнейшую работу с ним. Более адекватно ведут себя платные приложения.
Самые популярные сервисы для векторизации картинки в формат *.dwg: WinTopo, Aide PDF to DXF Converter, Print2CAD 2016, онлайн-сервис Cometdocs, PDF to DWG Converter.


Convert DWG to TIFF - online and free - this page also contains information on the DWG and TIFF file extensions.
Drag & drop files, or select link
Or choose a different format
(And agree to our Terms)
Email when done?
We'll get right on it
Overall conversion/upload progress:
| File Name | File Size | Progress |
|---|
| File extension | .dwg |
| Category | CAD File |
| Description | The .dwg file extension stands for drawing. One of the oldest file types, it was initially conceived in the 1970s for use with the early Computer Aided Design (CAD) devices for 2D and 3D drawings. The DWG format is licensed to Autodesk for their AutoCAD application which is the de facto standard for CAD drawings. Autodesk have robustly resisted attempts to reverse engineer the DWG format by other freeware applications building watermark protection into certain versions. The DWG files created by CAD applications are used industrially by architects, engineers and designers. |
| Actions | DWG to TIFF - Convert file now View other cad file formats |
| Technical Details | A .DWG file is a binary file that contains vector image data and metadata. The vector image data provides instructions to the CAD application about how to display the DWG on screen. The metadata may contain a variety of information on the file including location specific data and also client data. Files created using AutoCAD 14 also have a file verification checksum included, which validates that the file was created using AutoCAD. |
| Associated programs | Adobe Illustrator AutoCAD Autodesk DWG TrueView CorelCAD |
| Developed by | Autodesk |
| MIME type | application/acad application/x-acad application/autocad_dwg image/x-dwg application/dwg application/x-dwg application/x-autocad image/vnd.dwg drawing/dwg |
| Useful links | DWG File Format Specification More Information on DWG Files Autodesk DWG TrueView (To View) Convert DWG file |
| File extension | .tiff |
| Category | Image File |
| Description | Tiff was originally created by a company called Aldus, and is now owned by Adobe systems, it is a file format for storing images, including line art and photographs. It was created due to the popularity of scanners and was thought-up to become the standard scanned image file format. It is a popular format for high-colour-depth images and it has also been adapted to accommodate greyscale images. |
| Actions | Convert TIFF file View other image file formats |
| Technical Details | A TIFF file is made up of many different blocks which define the palette data or the LZW-compressed body among other things. The byte order is either Motorola or Intel depending on the first word. if it is MM, then you have Motorola byte ordering and likewise if it is II it means you have Intel byte ordering. Each TIFF file begins with an image file header which then points to an image file directory which contains the image data and image information. |
| Associated programs | CyberLink PowerDVD InterVideo WinDVD VideoLAN VLC Media Player Windows Media Player |
| Developed by | Aldus, Adobe Systems |
| MIME type | image/tiff image/x-tga |
| Useful links | More information about what a TIFF file is How can you open a TIFF file ? Convert TIFF file |
Using Zamzar it is possible to convert DWG files to a variety of other formats
- dwg to bmp (Windows bitmap)
- dwg to gif (Compuserve graphics interchange)
- dwg to jpg (JPEG compliant image)
- dwg to pdf (Portable Document Format)
- dwg to png (Portable Network Graphic)
- dwg to tiff (Tagged image file format)
Как перевести/сохранить Автокад в pdf
Иногда возникает необходимость распечатать чертеж, где не установлен Автокад, или отправить его Заказчику на согласование. Поэтому самый правильный путь — сохранить Автокад в pdf.
Давайте рассмотрим несколько вариантов, как сохранить автокад в пдф. Изначально лучше всего настроить параметры листов, которые используются для оформления и дальнейшей распечатки чертежа.
Определитесь с форматом и масштабом. Так же установите подходящую ориентацию чертежа. Особое внимание стоит уделить области печати. Есть 3 варианта: граница, лимиты, экран. Подберите подходящий способ.
Особое внимание уделите стилям печати. Если выбрать вариант monochrome.ctb, то весь чертеж будет выводится в черно-белом (монохромном) виде. Также важно, какое качество печати вы выберите.
Нажав просмотр в левом нижнем углу, вы можете видеть результат настройки.
Откроется уже знакомое нам диалоговое окно. Т.к. ранее был создан набор параметров, достаточно его выбрать. В противном случае выполните необходимые настройки, как описано выше.
Чтобы выполнить экспорт из автокада в пдф, необходимо выбрать меню приложения → Экспорт → PDF, как показано на рисунке.
Откроется диалоговое окно, как показано на рисунке.
Выполнить сохранение чертежа Автокада в пдф можно также через публикацию.
Далее появится диалоговое окно, в котором Вам будет предложено сохранить текущий список листов.
Еще одно информационное окно, предупреждает вас о том, что публикация выполняется в фоновом режиме. Просто закройте его.
Как вы видите, преобразовать или сохранить Автокад в пдф можно разными способами. Результат будет один и тот же. Помните, что данный формат обладает такими неоспоримыми преимуществами, как:
— на основе чертежа создается файл пдф, который можно открыть на компьютере, даже если не установлен AutoCAD;
— качество не теряется;
— при повторном открытии файла с разрешением .pdf в Автокаде в качестве подложки, можно использовать объектные привязки к элементам чертежа.
Итак, мы разобрали как в AutoCAD сохранить в PDF файл чертежа в формате .dwg. Надеюсь, у Вас больше не возникнет с этим проблем.
Как перенести чертеж в Автокаде?
В зависимости от этого существует несколько вариантов:
1) Перенос чертежей в Автокаде из одного файла в другой выполняется путем копирования исходных элементов (Ctrl+C) и их вставкой в др. чертеж (Ctrl+V).
2) Перенос чертежей в Автокад из картинки (*.jepg, *.png, *.tif) и pdf-формата автоматически выполнить нельзя! Все дело в том, что картинка представляет собой растровый формат, в то время как чертеж Автокада – векторный. Поэтому очень часто приходится прибегать к оцифровке или векторизации чертежей.
Существует большое количество сервисов, которые позволяют перенести чертеж в Автокад с картинки, автоматически преобразовав отдельные элементы в примитивы: линии, дуги, полилинии и т.д.
Вместо одной дуги получается огромное количество полилиний. Такой результат существенно перегружает проект, что затрудняет дальнейшую работу с ним. Более адекватно ведут себя платные приложения.
Самые популярные сервисы для векторизации картинки в формат *.dwg: WinTopo, Aide PDF to DXF Converter, Print2CAD 2016, онлайн-сервис Cometdocs, PDF to DWG Converter.
![]()

TIFF is the gold standard raster file format in the design, engineering and publishing industries. TIFF stands for Tagged Image File Format, and is the go-to format for high-quality graphics. Despite its popularity however, the TIFF format has many limitations: it can be difficult to edit, and it suffers from resolution dependency. To avoid these issues, users can convert their TIFFs to a vector format like DWG.
This guide covers everything you need to know about the TIFF to DWG conversion process. Plus, we’ll show you how you can get the Scan2CAD software to convert your files completely free for 14 days!
Table of Contents
What is a TIFF file?
TIFF (or TIF) was originally created in 1986 as an attempt to create a universal image file format for use with desktop scanners. It was a binary format, so images were only available in black and white. Once computer disk space increased, the TIFF format was expanded to accommodate color images. The format now has a 32-bit color depth, which means that it supports over 16 million colors!

TIFF is a raster graphics format, made up of individual pixels. The format makes use of lossless compression, so it can be edited or compressed without any loss in quality. This stands in stark contrast to the JPEG format, which is also popular for use in photography, but which suffers from low quality images.
These benefits of the TIFF format make it the perfect choice for high-quality graphics. In fact, it’s also Scan2CAD’s recommended file format for saving your raster images in order to get the best possible vectorization results. TIFF’s lossless compression ensures that the detail of an image is maintained, making it a good candidate for vectorization. Meanwhile, you’re likely to run into difficulties when converting from JPEG to DWG due to that format’s lossy compression.
That’s not to say it doesn’t have any disadvantages. The high quality of TIFF images comes at the heavy price of a large file size, which can mean that some web browsers don’t support them.
What is a DWG file?
DWG stands for DraWinG, and is the native file format for AutoCAD, which is the most popular CAD software on the market. Practically everyone who works with CAD will know the format well, and here on the Scan2CAD blog, we’ve already written extensively about the format. First created in 1982, DWG is a proprietary file format from the Autodesk stable of products, which means that developers must have a license to use the format in their software.
This format stores 2D and 3D data, and supports all standard vector entities including AutoCAD’s more ‘specialist’ entities like dynamic blocks. It’s also a binary file format, so a DWG file will typically be smaller in file size than a comparable DXF file, which is made up of ASCII text.
Though the format is best known as the native file format for AutoCAD, you can also use a wide range of other programs to view DWG files, including Scan2CAD. Check out our guide to viewing DWG files without AutoCAD.

Some examples of CAD software that you can use to view and edit DWG files
Want to find out more? Check out our DWG overview, and our guide to the pros and cons of the DWG file format.
Why convert TIFF to DWG?
While the TIFF format has many advantages over other raster file formats, it still has the same disadvantages that other rasters suffer from:

- Resolution dependency: if you change the scaling of a TIFF, then the quality deteriorates. You can see this when you zoom into a raster and its pixels become evident.
- Not easy to edit: rasters are made up of pixels, so you can’t edit individual lines, and any edits made will affect the entire image.
- Large file size: due to the detailed nature and high resolution of the file format, TIFF files are typically much larger in file size than other image file formats.
By converting your TIFF to a DWG you can gain access to a multitude of benefits associated with all vector files:
![]()
Infinite scalability: vectors aren’t resolution dependent, so you can rescale or zoom in as much as you want, without any loss in quality.- Easily edited: entities within a DWG can be edited individually.
- Reusable: you can take elements from a CAD drawing, and re-use them in an entirely new one. This is useful for when you have hard copy drawings to digitize, or when you wish to take elements from an older drawing and reuse it in a newer design.

Check out raster versus vector for more information.
How does the conversion process work?
The process of converting a raster to a vector—known as vectorization—involves tracing over the raster image with vector lines. There are two ways to trace an image: manually or automatically.
Manual tracing
This process involves tracing over the image by hand. You can either use a mouse to trace over every line, or make use of a tablet and graphics pen to draw over the raster.
Manual tracing can be advantageous, as automatic tracing lacks human understanding. For example, if you have an old hard copy drawing which has faded, a computer wouldn’t be able to trace over the image, as it wouldn’t be able to detect the lines and edges. Since you created the design, you’ll know and understand exactly where the lines should be.
Manual tracing can, however, be a very time-consuming process, and it can be difficult to get to grips with. This is why it often makes sense to use automatic tracing instead.
Automatic tracing
Automatic tracing makes use of raster-to-vector conversion software, such as Scan2CAD, to instantly convert your raster image. In order to perform this conversion, the software detects the lines and edges of your raster image and redraws them as vector lines, curves, polygons and other vector entities. You merely have to load your image into the program, and you can produce a vector image in just a few clicks.
Still need to be convinced? Check out the image below!
It isn’t as simple as choosing the first—or cheapest—conversion software available. Choose the wrong program, and you could run into trouble. It pays to choose a high-quality conversion program, and get the best possible vectorization results. This will ensure that you have a detailed, usable DWG file, that you can later open and edit using CAD software.
Want more information? Check out our comparison of manual and automatic tracing, for everything you need to know.
How to convert TIFF to DWG with Scan2CAD
![]()
With Scan2CAD, it couldn’t be simpler to convert your TIFF image.
- Load your TIFF in Scan2CAD. This works the same as opening a file in any program. Just click File >Raster >Load, and select your TIFF.
- Choose your settings. Scan2CAD has a range of vectorization settings, which are specialized to deal with specific image types. Use the Type menu to select the appropriate settings for your image.
- Convert your image. To vectorize your image you can either click:
![]()
: which converts lines, curves and shapes to vectors.
: to convert raster text to vector text.![]()
: which converts the entire image (both lines and text) to vectors.


Why choose Scan2CAD over an online converter?
If you wanted to convert from TIFF to DWG, you may be tempted to simply head to Google to find a free online tool. These tools promise a number of advantages—free conversion, no downloads, great results—yet sadly, they simply can’t deliver.
For an intelligent conversion and great vectorization results, you need a lot of computing power. It’s for this reason that most conversion programs run as local applications on your computer, rather than in the cloud.
Online converters, meanwhile, simply can’t offer the same quality of service. When you convert a file using an online tool, you may therefore find that it has been converted in a very simplistic manner. Not only will your vector image appear worse in quality, but it will also be much more difficult to edit in CAD software. Worse still, you may be putting your intellectual property at risk by uploading to servers that may not be secure.
There are many disadvantages to using online converters—but more importantly, plenty of reasons to choose Scan2CAD instead. Scan2CAD offers accurate, efficient conversion that’s 100% secure. With Scan2CAD, you can convert any file, regardless of size, and be sure of great results.
Free Download

Scan2CAD is the market leader in conversion, with the ability to convert raster images and PDFs to DWG, DXF, and many other vector formats—but it has even more to offer than that.
Not content to stick to conversion, Scan2CAD offers users the complete package. Its raster and vector editing suite gives you the ability to optimize your image before and after conversion, ensuring that you get the perfect vector output. You can also benefit from Scan2CAD’s incredibly useful batch processing feature, which can automatically convert hundreds of files in just a few clicks! Plus, with Smart OCR, you can train the software to recognize unusual fonts—and even handwritten text.
With Scan2CAD, you can rest assured knowing that you’re using a secure program that will keep all of your CAD files completely safe. Put simply, Scan2CAD gives you more for less. Best of all? You can get Scan2CAD completely free for 14 days. There are no limitations to this trial—convert as many files as you want; no restrictions, no watermarks. Simply click the button below to start your download now.
Читайте также:
